Hi knowledgeable chicken keepers!
After deciding a year ago that I wanted to keep chickens I'm finally starting to make a chicken run.
I have done a lot of research on here and the associated website, as well as other websites and I'm finally happy that what I have planned will be right for me and my chickens. Any suggestions or advice will be gratefully received.
I was originally going to get an Omlet Eglu and walk in run but came to the conclusion that what with a child in nursery I couldn't really afford to spend that sort of money so looked into alternatives. Next I settled on one of those wooden coop and run combos that seemed really affordable, but when I plotted it out on the ground it seemed really tiny for the 4 hens it was supposed to house. So back to the drawing board again and decided that the best option was to get a good quality plastic coop and build my own fully enclosed run. I have mostly settled on a Solway house. I would prefer a Green Frog but just a bit too expensive.
I've spent weeks designing the run because my DIY knowledge was less than my chicken knowledge. I didn't know what size of wood was needed, what type of screws, let alone how I was going to make a roof. I now know what a purlin and a coach screw are!
The area allocated to the chickens is approx 2.4m x 3.6m which gives an area of over 8sq m so adequate for 4 hens. Hopefully they will be let out in the garden for some time most days when someone is home. I have never seen a fox where I live but assume one would soon appear once it knew chickens were here. Therfore I am making the run as fox proof as I can. Also during the bird flu outbreak over the winter I was in a higher risk area so having a roofed run just seems like a good idea. Hopefully keep the whole enclosure cleaner too.
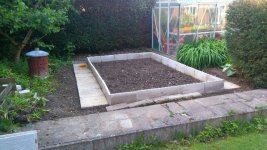
We inherited a lot of paving slabs with with house so thought I would put these to good use. I have dug these end on into the ground to make a sort of perimeter wall and more slabs laid flat around the edge onto which the frame of the run will sit. They form a path around the edge of the run and also keep any wood off the soil to minimise rotting. A fox would have a pretty hard time digging into the run I hope. The vertical slabs will also help keep any wood chip etc contained within the run. The vertical slabs will sit within the run. Hopefully the photo is clearer than my description!

I am going put in a weed proof membrane next to keep the mud at bay. Also I need to finish paving along the front edge. It doesn't look like much at the moment but this has taken many days of back breaking labour! The area was an overgrown raspberry patch a few months ago.
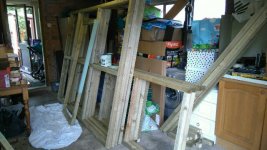
Yesterday my dad came over to help with constructing the panels for the sides of the run. In truth he actually did most of the sawing and screwing and I was assistant and project manager. The panels are constructed out of 50x50mm timbers so they are pretty sturdy. They are either 3 or 6ft wide, based on the width of the weld mesh I've purchased. I thought the less wire cutting the better. Amazingly we got all the panels built in one day - big thanks to husband who kept kids entertained all day.

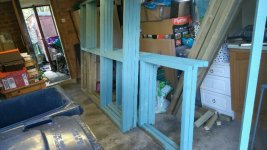
Today I have been painting the panels with Cuprinol Garden Shades 'Seagrass'. Husband declared he did not want an ugly shack in the garden so hopefully this will help it to look pretty. I thought I would get all the painting done today but only got just over half done. Who would have thought it would take longer to paint than construct! Hopefully will get some more painting done in the week.

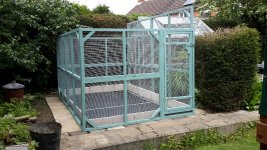
Next weekend I shall attach the weld mesh. I've a 30m roll of 1/2 × 1/2 inch by 36 inch mesh from Hills of Devon. I suspect this will be a pretty time consuming task too.
I shall keep you up to date with my progress.
Kathryn
After deciding a year ago that I wanted to keep chickens I'm finally starting to make a chicken run.
I have done a lot of research on here and the associated website, as well as other websites and I'm finally happy that what I have planned will be right for me and my chickens. Any suggestions or advice will be gratefully received.
I was originally going to get an Omlet Eglu and walk in run but came to the conclusion that what with a child in nursery I couldn't really afford to spend that sort of money so looked into alternatives. Next I settled on one of those wooden coop and run combos that seemed really affordable, but when I plotted it out on the ground it seemed really tiny for the 4 hens it was supposed to house. So back to the drawing board again and decided that the best option was to get a good quality plastic coop and build my own fully enclosed run. I have mostly settled on a Solway house. I would prefer a Green Frog but just a bit too expensive.
I've spent weeks designing the run because my DIY knowledge was less than my chicken knowledge. I didn't know what size of wood was needed, what type of screws, let alone how I was going to make a roof. I now know what a purlin and a coach screw are!
The area allocated to the chickens is approx 2.4m x 3.6m which gives an area of over 8sq m so adequate for 4 hens. Hopefully they will be let out in the garden for some time most days when someone is home. I have never seen a fox where I live but assume one would soon appear once it knew chickens were here. Therfore I am making the run as fox proof as I can. Also during the bird flu outbreak over the winter I was in a higher risk area so having a roofed run just seems like a good idea. Hopefully keep the whole enclosure cleaner too.
We inherited a lot of paving slabs with with house so thought I would put these to good use. I have dug these end on into the ground to make a sort of perimeter wall and more slabs laid flat around the edge onto which the frame of the run will sit. They form a path around the edge of the run and also keep any wood off the soil to minimise rotting. A fox would have a pretty hard time digging into the run I hope. The vertical slabs will also help keep any wood chip etc contained within the run. The vertical slabs will sit within the run. Hopefully the photo is clearer than my description!

I am going put in a weed proof membrane next to keep the mud at bay. Also I need to finish paving along the front edge. It doesn't look like much at the moment but this has taken many days of back breaking labour! The area was an overgrown raspberry patch a few months ago.
Yesterday my dad came over to help with constructing the panels for the sides of the run. In truth he actually did most of the sawing and screwing and I was assistant and project manager. The panels are constructed out of 50x50mm timbers so they are pretty sturdy. They are either 3 or 6ft wide, based on the width of the weld mesh I've purchased. I thought the less wire cutting the better. Amazingly we got all the panels built in one day - big thanks to husband who kept kids entertained all day.

Today I have been painting the panels with Cuprinol Garden Shades 'Seagrass'. Husband declared he did not want an ugly shack in the garden so hopefully this will help it to look pretty. I thought I would get all the painting done today but only got just over half done. Who would have thought it would take longer to paint than construct! Hopefully will get some more painting done in the week.

Next weekend I shall attach the weld mesh. I've a 30m roll of 1/2 × 1/2 inch by 36 inch mesh from Hills of Devon. I suspect this will be a pretty time consuming task too.
I shall keep you up to date with my progress.
Kathryn

