New coop for newbie

ColinB

New member
Joined
Jul 29, 2016
Messages
72
Reaction score
0
Location
Powys, Wales
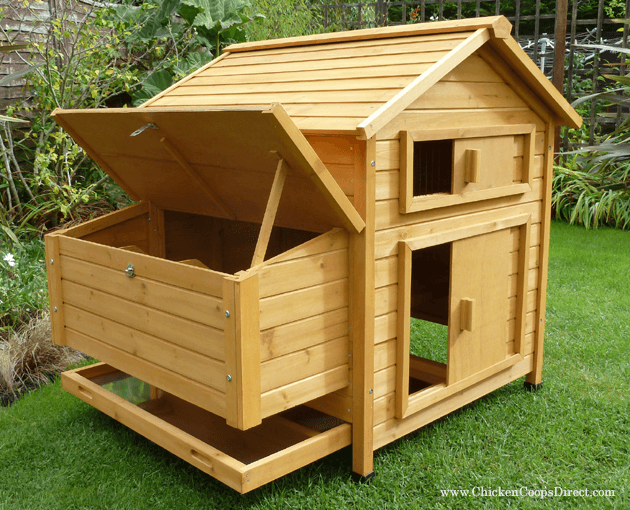
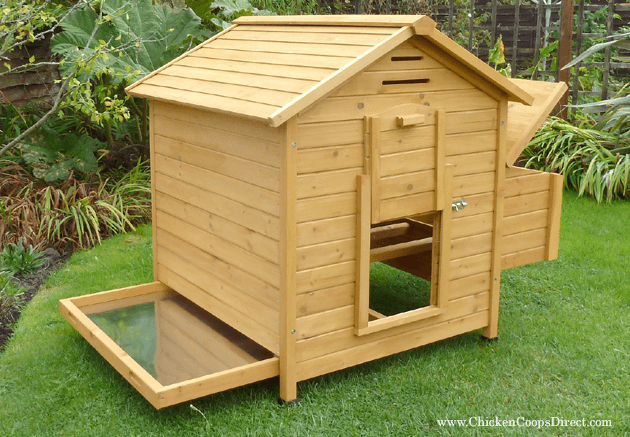
My new coop arrived this morning, a Devon model from Chicken Coops Direct (Clickety -click). A shade on the flimsy side - not that I've got anything to judge it against, but the things I build do tend to be over engineered. I'm a little concerned over the lack of ventilation. There are the two thin slits above the pop-hole, and a sliding panel on the back which seems to be a bit low down. However, the ridge piece along the top ot the coop is separate, so I might just raise that by ¼" before screwing it in place to give extra ventilation at the highest point of the coop.

The sliding panel at the bottom of the back wall isn't anything like big enough to enable a good internal clean (unless you're a gynecologist) but the nesting box unit is removeable to leave a large hole, and the bottom tray slides out. That should be enough. I'm going to mount the fixing bolts with their heads inside the coop and get some butterfly nuts on the outside so - if need be - I can remove the whole of the rear wall.

I've assembled a few pieces and put a good coat of yacht varnish over the inside walls making sure that the joins between the T&G and all the other wooden joins are full. Hopefully this will reduce the areas for the red mites to congregate.

A few piccies of bits of wood.....more to follow.

20160802_105410.jpg


20160802_122047.jpg
 
A regular mantra here is,
Secure run - pop hole permanently open!
If the pop hole faces away from prevailing winds then no ventilation worries and the hens can get up as early as they like in the morning. They put themselves to bed at dusk in the cutest manner and don't go for a wander in the dark (very poor night vision.)
As long as they have cover from rain and direct wind they can keep themselves warm below freezing (apart from some less hardy and small birds.)

They are very vulnerable to rodents and the like when sleeping and chicken food attracts them which is why making the run a no small furry mammal zone is the most important thing.
 
I certainly agree with Rick about the desirability of having a really secure run, so you can then leave the pophole open all the time and be confident that the birds are always protected. Without this, you're right that the ventilation is an issue in this coop. Your idea of raising the ridge is excellent, only I would raise it by at least 0.75 of an inch to an inch to be effective. This will help warm, moist air to find its way out, whilst the pophole will enable clean air to enter from lower down. Alternatively, if you felt you needed to close the pophole, you could cut spaces along the sides and either fix weldmesh over them, or buy ventilation panels from a homeware store such as Wickes. I used these in a quail shed, they were about 9" by 4" and worked well, let air in but not rain. Of course much depends on whether the coop is going to be under cover in a roofed run, or a covered part of the run, as this makes it much easier to modify it without affecting the waterproofing.
Could you post a pic of the back wall? It makes an enormous difference if you can easily remove the whole back wall like an extra door, to poo pick daily and also to sweep into the corners, though I suppose the tray will help with this. Is there a sort of sliding window near the top, and is this supposed to be for ventilation? This would help if the pophole was closed, but wouldn't be very secure if the coop wasn't in a secure run, a predator could easily get in I think. Perhaps you could cover the back of the hole with Weldmesh?
What will you use to treat the outside? Traditionally, creosote is used but it's nasty stuff and it's difficult nowadays to buy the proper oldfashioned toxic-but-effective kind. I've found yacht varnish tends to peel when exposed to the weather, and you might consider the sort of 5-year wood preservatives that are easily available nowadays.
As you're starting with new equipment, you should be able to prevent redmite altogether if you can exclude wild birds from your run, and also roof it so they don't sit on the mesh at the top and shake mites off their feathers on to the run and coop below. Also give the birds a few drops of Red Stop in their drinking water, which is a herbal preparation which makes their blood taste nasty to any stray mites that might get to them, so they can't feed, and thus don't multiply. Once red mite arrives, in a wooden coop with tongue and groove construction like thus one, you have it for evermore, so prevention will save time, money and heartache in the long run. A roof for the run is a wonderful thing in wet weather, no mud, and much more comfortable for the hens.
Lastly, how many hens are you thinking of putting in there? I see the website suggests 5-6, but people on here who've experienced these coops would probably advise a maximum of 4 hybrid-sized birds, using two of the perches rather than three.
 
Thanks, Marigold, for such a good reply. I will certainly increase the ventilation... the pop hole will be facing South-West because of how the coop fits in to the available space so that will probably have to remain closed over night unless I can rig up a wind brake. The ridge will be raised as far as the wood fittings allow, unless I can make something to raise it even more. I will also cut in extra ventilation under the eves at the sides. Both sides will be well sheltered.

Here's a piccie of the back of the coop that I've lifted off their web-site:

Devon-new2.png


The top slider is for ventilation, and the bottom slider is for cleaning. It's too small, isn't it? *harrumph* I'll bolt the whole thing together tomorrow (when the varnish is fully dry) and see how much access there is, but I feel that it'll be 'out with the jig-saw' and make all of that lower panel into a swing out door.

It will be for four of the hybrid types, and I'd already decided to use just one of the perches...... which seem a bit low to me. *sigh* You can see where the perches are positioned in this piccie:

Devon-new6.png


mmmm - more wine! :D
 
That's a Chinese built coop ColinB, just sold by Devon. We have something similar and ventilation was indeed a problem as was waterproofing the wood. It all depends on the location as said. Under a covered and secure run the solution is to leave the pop-hole open, plus the raised ridge as described should work well, but be prepared to adjust seasonally. Otherwise you will need to paint the wood (Cuprinol Shades 3 coats) and add extra ventilation which is best with covers for extreme weather. I have to add that the Chinese have improved their design a bit,but after nearly 6 years on the market I would expect them to be far better. They have tried to sell them here, but the local outlet has sold none in a year and packed up. In our hot situation ventilation is crucial, so without it they are better off in a tree and subject to the foxes rather than suffocation.

The clue to the origin is the method of construction. Labour is cheap in China so their elaborate jointing couldn't be done here. English coops have a basic framework of 30+mm square clad with 12mm or 16mm pine boarding and start at around £400.
 
I think two perches for your four birds would be best, as there won't be room for all 4 of them on just one perch. So long as the perches are higher than the base of the nestboxes they'll be OK, but if they're the same height or lower, the hens will roost in the nestboxes and early morning eggs will be soiled by overnight poo. Could you re-position two of the perches so the hens have more room front and back? They don't like sleeping with their tails squashed against a door. Are the perches easily removable for cleaning, and for inspecting for red mite, and dusting the joins with diatomaceous earth?
What sort of run are you going to make, and how big can it be? For four hens you'll need a minimum of 8sq. metres of run floor space, more is better if possible, and if you could raise the coop up more off the ground, they could get underneath it and thus use the space. Also, the higher the coop the less strain on your back when getting down to inspect and clean it. It could rest up on blocks, or maybe you could make a frame for it to sit on.
 
To give you an idea of the amount of air movement they are quite happy in Col, my run (and dinosaw's too I think) are a roof with open sides that they roost in without an enclosing coop. My back garden is typical fenced mid terrace in town and quite small so we have good wind shelter all round. I have some heat lamps directed at the open roosting shelf set to come on only if it is proper brass monkeys (v. hard frost) but that is uncommon round here.
Mid Wales, out of town, you’ve probably got to be a bit more cautious but its amazing how a few chickens will raise the temperature by several degrees in a relatively small coop. They are like a row of hot potatoes!

Just to qualify this - my heat lamps only run at -3 degrees and take the temp back up to 0. Additional regulated heat in a closed coop is never necessary or a good idea unless you were in Siberia!

... and they are far infra-red radiators. Never shine any light on a sleeping chicken unless you want them to lay their socks off when they should be having a rest!
 
Thanks, all (Rick posted while I was typing.... and correcting my rubbish spelling). There's no fox problem around here - we're in the middle of sheep farming country and any fox that sticks a nose out gets blasted by all the local farmers with their shotguns. One of our neighbours keeps chickens, ducks and geese with absolutely no fox protection and has never lost one. Rats will be a bigger problem as the local farmer breeds pheasent to shoot over the winter and has various grain 'stations' locally, including in the copse next to the house. This is when Fogarty the Cat and my air rifle will come in handy.

The perches are higher than the base of the nest boxes (but not by much), and the back one is 8" from the rear wall and the perches are 8" apart. They're very easily removeable for inspection and dusting. It would be easy to fashion a new holding system for the perches to change the spacing and/or increase their height if you think that's advisable.

I will be cutting in a lot more ventilation, both front, back, sides and top.

The coop will be raised ~24" off the ground and the under-coop space will be protected from the wind and will have the feeder and drinker.

I am (or was) going to let them straight out of the coop to free-range in approx 25sq.m of shrubby and sheltered ground that lies between the house to the West, the big shed to the East and a large copse of trees to the North, with various areas of built-up shelter where dust baths will always remain dry and they can hang around in 'bus shelter' type accomodation. I like building stuff.

Please keep the suggestions coming.

p.s. Living in the 'forgotten county' of Powys it's difficult to get 'stuff' except by mail order. However; I've just found out (today) that the local mid-Wales chain of Hay & Brecon Farming Supplies keep basic chicken farming stuff - including Aubiose hemp bedding which, because of it's weight, incurs a hefty delivery charge if you can't collect it yourself. There's one in Llandrindod - so I'm good for feed and medicinal type supplies. Woot!
 
That's excellent, - sorry, I'd forgotten your earlier post, saying you had so much safe space for them. Lucky birds!
The roofed open-fronted bus shelter sounds a very good idea, though, and I think that, if you like building things, your coop would last longer in wet Welsh weather if you could get it in under this. They will appreciate sides to the bus shelter, to keep out wind and rain, as otherwise the rain will just blow in under the roof edge. Also, in horrible weather it's much nicer for the human to be able to take cover whilst doing the daily tasks of caring for them. It's essential that the feeder is kept really dry - even exposure to misty rain will quickly make the pellets clog up and go mouldy.
Great about the local farm store, especially if you can collect Aubiose for free.
 
Thanks, Marigold.

Here're my latest modifications.

I cut 1cm off each of the internal roof supports so the roof halves sit further down the sides and leave a nice gap along the top:

20160803_085300.jpg


I then raised up the ridge piece (it's propped up here so you can get the idea);

20160803_085233.jpg


Then I cut out between the existing vent slots on the front wall of the coop to give a much bigger area. The wire mesh to fit is resting just below it;

20160803_092717.jpg


D'you think that these mods, plus the sliding open vent on the back wall(see a previous post for piccies) will be enough ventilation... or shall I carry on with the cutting?
 
That roof ridge modification looks a really good idea to me, also enlarging the slits has worked well. With the sliding panel I should imagine you'll now have enough ventilation, and if you do find there's any condensation inside, you can always increase the area.
Theyre most at risk on cold winter nights if they've gone to roost with wet feathers, which then dry off and create lots of water vapour inside the coop. If ventilation isn't adequate, this creates a stuffy 'doctor's waiting room' atmosphere, where bacteria can breed and they can get bronchial diseases.
 
Thanks ever so for your help, Marigold (and others). I shall keep this thread going as the work progresses and, hopefully, I put four hens in next weekend.
 
Thanks. I'll be getting the wood for the stand tomorrow.... and I managed to get a couple of straw bales today. There's no straw at all round here 'cos no one grows wheat in the middle of Wales. However; a quick trip to the parents in the West-mids and 100 yards from them is someone selling straw bales. ooo - I'll have a couple of them in the back of the van, please. That'll be a bit of a wind brake and shelter for the girls... and perhaps a bug or two will be found. I'll get more next time I visit.

This chicken keeping is addictive and I haven't got any yet. I do hope Tufnell the dog will be OK with them - I can see some serious training sessions ahead. Then there're the two cats....? I think the 22 fish will be fine.

20160512_085336.jpg
 
You will be amazed at how quickly a bunch of chickens can spread a straw bale over a wide area! Whenever I get new Auboise I just put it in a pile in the run and sprinkle a few meal worms on top - job done in half an hour. Looking forward to seeing some pics of your new hens enjoying the Welsh scenery :)
P.S. Chickens love fish. Good luck!
 
mmm - I have, up 'till now, always used Picasa as my photo hosting site. It's now re-designed itself into a google thing that assumes that I want to share my life with the world so everyone can access my photos. They can obviously get lost as I don't use any social media at all and don't want this at all, so I'm now completely unable to post piccies of my latest modifications as I've tried everything I can in their funky new site.

I'm just about ready to use my lap-top to hammer nails in unless someone can point me in a direction of how to post piccies. :-)19
 
Try these links Col and see if they help

http://poultrykeeperforum.com/viewtopic.php?f=27&t=5624

http://poultrykeeperforum.com/viewtopic.php?f=27&t=9735&p=58712&hilit=mac#p58712
 
Thanks for that, Dinosaw.

I'm trying to get round Photobucket at the moment, it seems to take ages to load, but I'll persevere for a while.

So.... here goes....

The latest modification was to increase the access hole to help with cleaning. It was a sliding door, but that only gave sort of ½hole access as the door took up half the area. So I cut out the whole area....

Resize 1.jpg

...and stuck the door and some of the wall on to a piece of marine ply that I cut to size to fill the hole...

Resize 2.jpg.

The plan is that I can lift out the panel and have twice the access than was originally there, but it still looks like it 'belongs' to the coop.

p.s. I gave up with Photobucket 'cos it was taking ages to execute any keystroke. So I used the Paint function as Dinosaw suggested. Thanks.
 

Latest posts

Back
Top