my home made incubator

simon+colette

New member
Joined
Feb 15, 2012
Messages
27
Reaction score
0
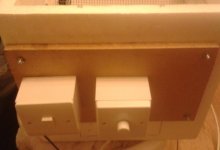
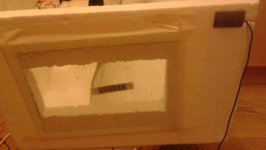
as above its made from a polystyrene box which was purchased from a tropical fish store, a 60w light bulb, dimmer switch, fan switch, circulation fan (from an old pentium 4 pc, with a 5 volt psu to lower the rpm), some old picture frame glass, wire mesh and 4 thermometers and 2 hygrometers.

costings were as follows
poly box £2.50
bulb 60p
dimmer £5.09
switch 89p
fan - free
psu - free (old phone charger)
glass - free (old clipart pic frames lying around)
mesh £2.50
meters £10 approx (1 liquid fish tank type, 1 forhead type stuck to the glass, 1 therm/hydro digital and 1 therm/hydro reptile breeder one)

total cost £21.58
 

Attachments

  • 2012-03-17 19.12.22.jpg
    2012-03-17 19.12.22.jpg
    159 KB · Views: 17,472
  • 2012-03-17 19.12.36.jpg
    2012-03-17 19.12.36.jpg
    143.1 KB · Views: 17,472
  • 2012-03-17 19.12.10.jpg
    2012-03-17 19.12.10.jpg
    164.5 KB · Views: 17,472
I'm very impressed with that Simon. So the heat from a dimmed 60 W light bulb was enough. Presumably you just stabilised the temperature using the dimmer to adjust the heat output and then kept an eye on it.

A member has made an incubator from an old fridge using an ATC210 controller with a heater. But you coul make three of yours for the price and I'm not convinced of the temperature stability of the controller. It can be adjusted to 0.1 degree but that's not the operating variation. Probably accurate enough though.
 
Thought about something else while I was driving along this morning. As the temperature is dependent on a steady state reached between heat lost when the unit is closed and heat input from the lamp, if you open the lid to turn the eggs or candle it might take an awful long time for the temperature to recover back up from room temperature. If so it needs a boost lamp to put a lot of heat back in for a short time and then back to the unit stabilising itself. Alternatively a heat reservoir like a large jar of water. This would give some insurance as well, in case of a power failure.
 
hi chris yes i too wondered that but fortunatly the lid is only off for a few seconds as the eggs sit on a poly box they were sent in and the other half of the box is placed on top and flipped 180 degrees all this takes about 30-40 seconds we noticed that the most it dropped was about 2 degrees and turning up the dimmer just allows for that bit extra heat and its normally back up within 5-10 minutes then its just a case of monitoring it for a while to stabilise it.

i may well put in a bottle of water on the left side as there is adequate space and i can see that working.

it sounds tedious but it really isnt at all, i would recommend trying it to anyone, unless you want to go into business hatching eggs then this is a worthwhile alternative.

if any one needs any more info just ask away.
 
Well done to you.I have bought selfmade incubator on e-bay and I have very smal halogen bulb inside with computer fan to mix the air and both are fitted on the lid of the box which makes loads of space for the eggs and do not take alot of power.It was very relible and I had very nice chicks hatched in it.This is how its look http://www.ebay.co.uk/itm/INCUBATOR-BROODER-FAN-ASSISTED-HOLDS-25-EGGS-TEMP-HUM-GAUGE-INCLUDED-/320868996934?pt=UK_Pet_Supplies_Reptiles_Spiders_Insects&hash=item4ab5485746
 
I think your incubator is just incredible, you must have found great pleasure in inventing it from all those bits and pieces, and enormous pride when oit worked. Let's hope the next lot of eggs will be better able to help you to more success in hatching next time. Obviously you would be good people to be marooned with on a desert island! In a hot enough country I bet you'd have a solar=powered inci up and running in no time at all.
 
That's a good incubator as well Tygresek. Looks like I'll be building one in France, because we can't afford anything expensive when we get there and I'll have plenty of time -if I can find the boxes all my equipment is packed in! Hiring a whole artic to move almost everything and then cramming it into a cellar when it gets there.
 
Thank you simon+colette for sharing the photos and info on your home made incubator. I hope you don't mind I have "stickied" your thread, as I am sure lots of members will find your thread interesting and inspirational! :-)17 :-)08
 
will show my OH this as I desperately need an incubator (or 2!!) thanks for sharing :)
 
hi all, no i dont mind at all if its stickied , if it gives people inspiration then thats what its all about.

just a couple of things to note though, when i built it originally it only had one glass pain on the outside but i couldnt get the temp past 32 degrees it was then i thought of the secondary pain on the inside and this takes it to 43 degrees then i just dim it accordingly to set it back to 37.6.

also regarding humidity, i used a chinese takeaway box with two kitchen sponges added for more surface area, but this time im going to try the 'dry' method and only add water after day 18 and use the J cloth ideaa with it sticking out and trailing to raise the humidity higher.

i also put an argos book on the lid to weight it down, as its surprising how much 'lift' is attained from a 5 volt fan.

tygrysek75 its the incubator you have that gave me the idea in the 1st place but me being a cheapskate i thought i could do it better and cheaper lol.

cheers simon
 
tygrysek75 said:
Well done to you.I have bought selfmade incubator on e-bay and I have very smal halogen bulb inside with computer fan to mix the air and both are fitted on the lid of the box which makes loads of space for the eggs and do not take alot of power.It was very relible and I had very nice chicks hatched in it.This is how its look http://www.ebay.co.uk/itm/INCUBATOR-BROODER-FAN-ASSISTED-HOLDS-25-EGGS-TEMP-HUM-GAUGE-INCLUDED-/320868996934?pt=UK_Pet_Supplies_Reptiles_Spiders_Insects&hash=item4ab5485746

i brought one of these and it was great, i did paint the inside of it first to help to keep it clean, i am now planning to go a bit bigger so i was thinking about buying a different set up as a controller, i must admit i dont like the light bulb thing and want to go towards a heater wire or a trace heater wire instead , i have found some rated at 40 watt per metre so a couple of metres should do it
 
In front of the fan I would say Fabgirl, avoiding radiated heat from the lights and just measuring the air temperature.
 
Good job. The best hatching success I've had was with my homemade incubator. Some years ago I constructed a small twin-wall cabinet from 25mm polystyrene sandwiched between 15mm white melamine, and a double glazed window in the door.
 
Inspirational Simon+colette. Biggest problem here is power cuts, so if we can store heat inside the incubator to give us time to set up the inverter that's good. Dry method is dependant on the humidity inside your house. Old houses can run at 70% and new at 30%. So running dry means different things to different houses. The only certain method is to check the formation of the air sac. Over here the humidity can run from 80% to 20% in a day -very difficult to work, with so auto humidifiers are great. Alternatively just use your nose and adjust the water surface area.
 
chrismahon said:
so if we can store heat inside the incubator to give us time to set up the inverter that's good.
reusable ice packs (as sold for picnic coolers etc) are supposed to have high thermal storage capacity. I have used them to good effect to fill thermal voids in a couple of very old mechanical (ether, I think, capsule thermostat) incubators.
They are also good to use as "dummy eggs", by which I mean if you are incubating just a few eggs in say a 40egg 'bator then the ice packs can fill up and stabilise the rest of the 'bator.
 
That incubator is fab! I may steal your idea? I never realised a bulb like that could emit enough heat
:-D :) :-D :-)08 :-)17
 
Back
Top